
It has been possible to connect Google Analytics and Google Search Console for several years now, however, we still see some brands not utilising this feature, and the way in which you connect the accounts has changed slightly since both Google Analytics’ and Google Search Console’s interfaces have changed over the years.
Having this integration in place on your website is critical if you want to get the most accurate organic traffic data and especially if you want accurate organic keyword data for your website. Since the majority of keywords in Google Analytics are now reported as “not provided”, having this integration in place is another way of getting more organic information back into Google Analytics.
Disclaimer: Using Google Search Console is not 100% accurate when it comes to showing exactly how many users visited the website organically and for what term, but it is accurate enough to make educated strategic decisions with to improve your website. It is also not a direct fix for the “not provided issue”. It simply reports the query data from Google Search Console.
Below are the steps to integrate Google Search Console and Google Analytics as it currently stands in September 2019.
Create a Search Console Account
If you already have a Google Search Console account connect then you can skip this step.
The first step is to go to Search Console, either sign in to your Google account or register to create a new Google account. Once this is done you will be able to click “Add Property” and a screen like the following will appear.
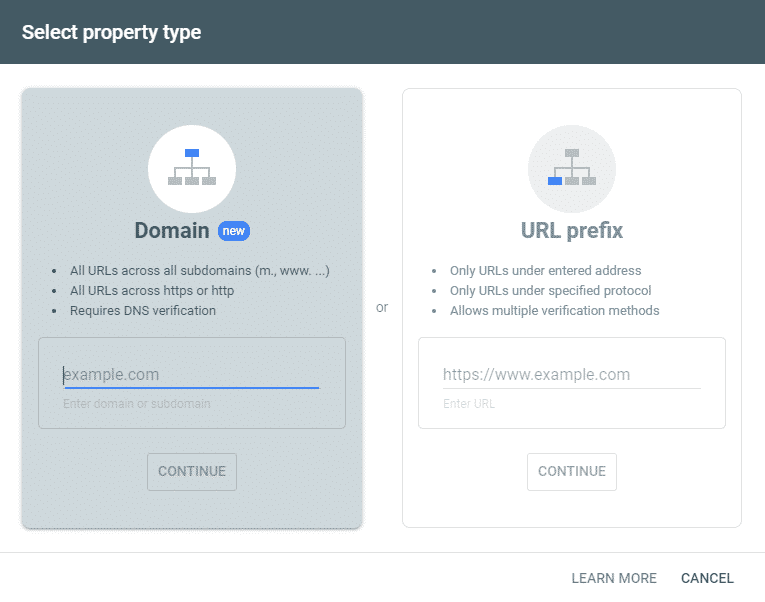
Since the Google Search Console update in 2018, there are now two ways of connecting a new property as you can see above. Both methods are fine and acceptable, however, we would recommend using the “Domain” option as this automatically includes all www, none www, HTTP, HTTPS and any other subdomains under one account. There are some situations where “URL Prefix” option may be better (if you only want to look at one subdomain), but for most cases the domain option will be best.
Domain: To connect the property you will need to have access to your domain’s control panel to add in a TXT record to the DNS configuration. Google has several listed instructions on how to do this as part of this step, but if you do not have access to your domain control panel this may be an issue.
URL Prefix: Connecting via a URL prefix has several more options and some that are simpler:
- HTML file: This is the most common solution and is very simple if you have Ftp access. Google will provide you with a small file to download and place on the root of your website’s hosting environment.
- HTML tag: This involves adding a specific tag within the <head> section of your website. It’s very simple if you have FTP or website admin access.
- Google Analytics: This option is again very simple and will work if you already have Google Analytics set up on the same Google account.
- Google Tag Manager: This is the same as Google Analytics except it applies if you have Google tag manager set up on the account. Again a very simple one-click method.
- Domain name provider: Finally, using your domain name provider is the same as setting up via the domain option above. You will need to add a TXT record to your DNS configuration.
Keep in mind that connecting via “URL Prefix” will mean that you will need to connect several properties to get all the data for your website. You will need to add in a property for www, non www, http and https versions of your website. It does not contain all subdomains like the “Domain” option. For example, if I was connecting quibblecontent.co.uk I would connect the following:
- http://www.quibblecontent.co.uk
- http://quibble.digital
- https://quibble.digital
- https://www.quibblecontent.co.uk
Once this is done you are set up and ready to go. For those setting up Google Search Console for the first time, the search data may not appear immediately, so don’t be alarmed if it is empty.
Connect the Search Console Data into Google Analytics
The next step is to link the Google Search Console property into the Google Analytics property.
For this section, we are going to assume you already have Google Analytics set up. If you need to set up analytics then Google has provided a great guide to do this.
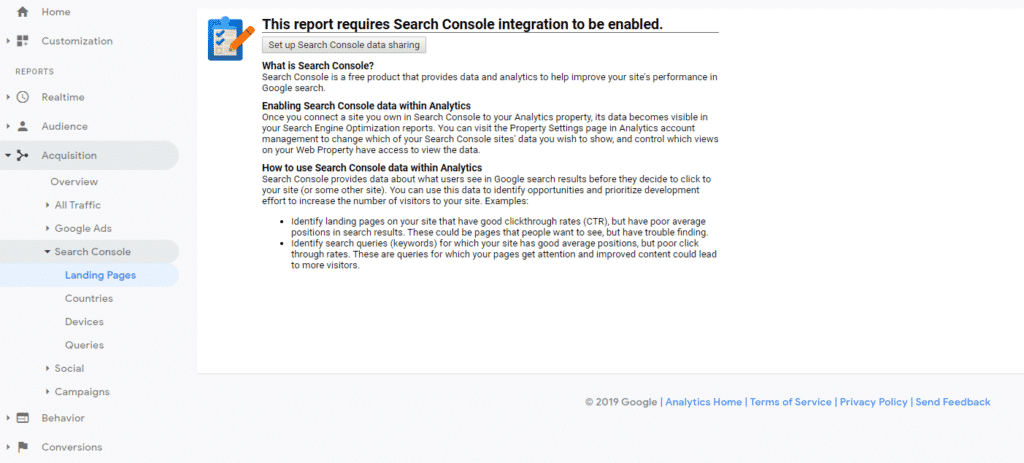
As you can see from the screenshot above, the easiest way to link Google Search Console is to go to:
- Acquisition tab
- Click Search Console
- Click Landing Pages
- Click the button “Set up Search Console Data Sharing”
This will take you to the property settings page within the admin section of Google Analytics.
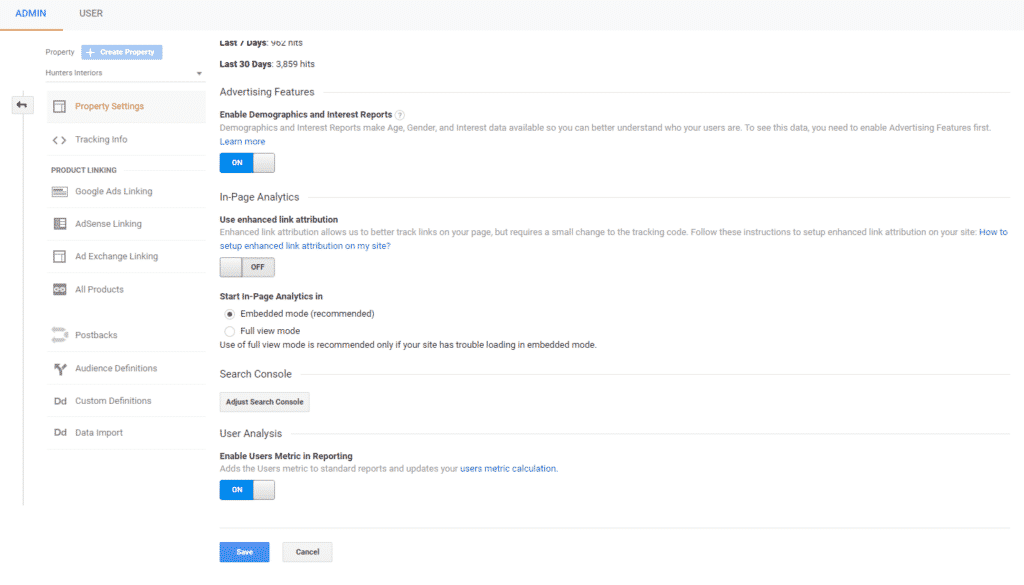
Scroll to the bottom of the page and you will see an option that says “Adjust Search Console”. Click on that and you can select the property you want to add.
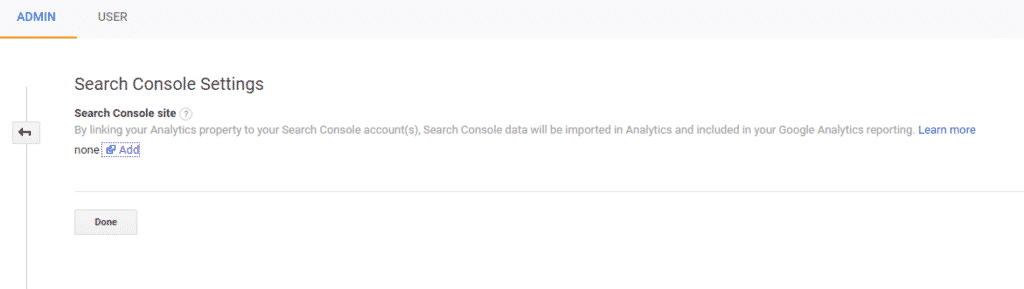
From here, click the “Add” link, this will open up a new page with all Google Search Console properties that exist on the account.
Depending on how you set up your Google Search Console property you will need to be careful to make sure you select the correct one. You want to select the property that is indexed in Google and receiving all of the organic traffic from search engines.
If you are not sure on how to find this out, simply enter your brand name into Google and check the URL that is indexed.

As you can see from the example above, the Quibble Content website has the non www, HTTPS version of the website indexed so that is the Google Search Console property I would choose.
Finally, depending on how you have your Google Analytics set up you may be provided with an option to select a particular view. The default on new Google Analytics accounts is called “All Web Site Data” and that will be absolutely fine, however, it may be worth adding in others if you have them.
That is it. Your accounts are all connected and data will start to import into Google Analytics.
Changing Google Search Console Property
If you make a mistake or need to change the Google Search Console property in the future, you just need to go back to the “Property Settings” area in the “Admin” section of Google Analytics. You can do this by going to:
- “Admin” in the bottom left of Google Analytics.
- Click “Property Settings”.
- Click “Adjust Search Console”.
- From here you can delete the site that is set up and add the one.
Why is Linking Google Search Console important?
Linking Google Search Console is a great way of getting more accurate organic traffic data for your website. For example, in Google Analytics you can now go to “Acquisition/Search Console/Queries” and view the number of visitors for a particular keyword. This feature alone gives you a huge amount of information such as:
- How many brand search you are getting.
- How many commercial keyword searches you are getting.
- It lets you analyse search query differences between mobile and desktop.
- You can produce more advanced reports that lets you monitor your brand/non-brand split of search queries over time so you can monitor your brand reputation.
Summary
Linking in Google Search Console with Google Analytics is a no brainer since they are both freely available tools and you can get a lot of information imported into one place.
A few things to keep in mind, when you add in Google Search Console the data will not backdate. So, you will need to leave it a while to collect data before you can start digging around. The same goes for a brand new search console account because it will not have any data it will not import anything.
Also, the latest version of Google Search Console stores data for a maximum of 16 months. So, when you are fully operational and analysing search console data from Google Analytics you will need to keep this in mind if you are analysing a lot of data over time.
That covers the full integration of Google Search Console into Google Analytics. The analysis work is up to you.